Explain Ancestor relative source binding in WPF?
Answer
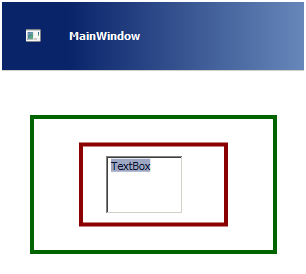
This relative binding helps to bind properties to the parent element properties. For example in the below XAML code we have a textbox which has two border’s as a parent. One border is having dark green and the other border is having dark red color as the border color.
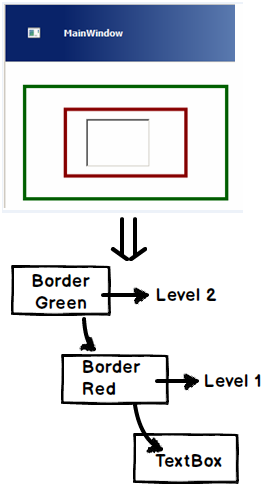
The dark green color border is the parent element followed by dark red and the text box the child element at the end of the hierarchy.
<Border BorderBrush="DarkGreen">
<Border BorderBrush="DarkRed”>
<TextBox />
</Border>
</Border>
Below is how the WPF application looks like when it runs.

Now we want the background color of the text box to be binded to one of the parent border colors. To achieve the same we can use ancestor relative binding.
Below are some important properties in Ancestor type binding we need to know before we writing the binding code.
| Property | Description |
| AncestorType | Which type of parent element is it?. Is it a border element , grid element etc. |
| AncestorLevel | An element can have multiple parents. For example in the above XAML we have two parents one with red color and the other with green. So this property specifies which level of parent element we want to refer. Below is the figure which depicts the levels. The red color border is level 1 and the green color border is level 2. So the nearest element becomes the first level and so on. |
| Binding | This specifies which property we want to bind to. For the current example we want to bind to border’s brush color. |

So the relative binding code with ancestor level 1 i.e. red looks as shown below. In case you are confused with any of the properties please refer to the previous table for more information.
<TextBox Background="{Binding BorderBrush, RelativeSource={RelativeSource FindAncestor, AncestorLevel=1, AncestorType={x:Type Border}}}"/>
So now the complete XAML with parent border element looks as shown in the below code.
<Border BorderBrush="DarkGreen"><!-- Level 2 ->
<Border BorderBrush="DarkRed”><!-- Level 1 ->

<TextBox  removed="{Binding BorderBrush, RelativeSource={RelativeSource FindAncestor, AncestorLevel=1, AncestorType=

{x:Type Border}}}"/>

</Border>
</Border>
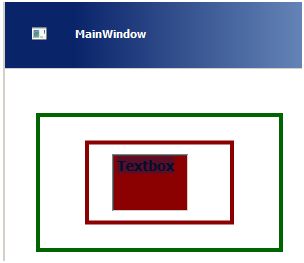
Now if you run the above XAML code the textbox is binded with the back ground color of the first border. If you change the ancestor level to 2 textbox background color will change to green.

PreviousData
 Copy Code
<ItemsControlItemsSource="{Binding}" Margin="10">
<ItemsControl.ItemTemplate>
<DataTemplate>
<StackPanel>
<TextBlockFontSize="14"FontWeight="bold"
 Margin="20"
 Text="{Binding Value}" removed="Aqua">
</TextBlock>
<TextBlockFontSize="14"FontWeight="bold"
 Margin="20"
 Text="{Binding
RelativeSource={RelativeSourcePreviousData},
 Path=Value}" removed="Blue">

</TextBlock>

</StackPanel>
</DataTemplate>
</ItemsControl.ItemTemplate>
</ItemsControl>

publicclassItem : INotifyPropertyChanged
    {
privatedouble _value;

publicdouble Value
        {
get { return _value; }
set { _value = value; OnPropertyChanged("Value"); }
        }

        #regionINotifyPropertyChanged Members

publiceventPropertyChangedEventHandlerPropertyChanged;

        #endregion

protectedvoidOnPropertyChanged(stringPropertyName)
        {
if (null != PropertyChanged)
            {
PropertyChanged(this,
newPropertyChangedEventArgs(PropertyName));
            }
        }
    }
publicclassItems : ObservableCollection<Item>
    {
public Items()
        {
Add(newItem { Value = 80.23 });
Add(newItem { Value = 126.17 });
Add(newItem { Value = 130.21 });
Add(newItem { Value = 115.28 });
Add(newItem { Value = 131.21 });
Add(newItem { Value = 135.22 });
Add(newItem { Value = 120.27 });
Add(newItem { Value = 110.25 });
Add(newItem { Value = 90.20 });
        }
    }
All wpf Questions
- .Net Interview Questions And Answers
- All Interview Questions And Answers
- Android Common Tips Q and Ans
- AJAX Interview Questions And Answers
- Codeigniter Interview Questions And Answers
- Aptitude Interview Questions And Answers
- C Interview Questions And Answers
- CSS3 Interview Questions And Answers
- Data Structure Questions With Answers
- Database (DBMS) Questions With Answers
- Drupal Interview Questions And Answers
- Download Career Guide in doc file
- Dojo Interview Questions And Answers
- Design Pattern of all type
- EJB Interview Questions And Answers
- Header Function use in PHP and HTTP
- HR Interview Questions And Answers
- HTML5 Interview Questions And Answers
- Joomla Interview Questions And Answers
- Iphone Interview Questions And Answers
- MYSQL Interview Questions And Answers
- Java Interview Questions And Answers
- JQuery Interview Questions And Answers
- JSON Interview Questions And Answers
- JSP Interview Questions And Answers
- linux Commands and Interview Questions
- Moodle Tutorial for Developers
- Magento Common Tips Q and Ans
- Networking Hardware Questions with Answers
- Operating Systems Interview Questions
- OOPs Interview Questions and Answers
- PHP Interview Questions And Answers
- PHP Interview Questions 1500+
- PHP All Objective Questions Answers
- PHP Jobs for freshers and experienced
- Project Management Interview questions
- Regular Expressions Interview questions
- Spring Interview Questions Answers In Java
- Software Testing Interview Questions Answer
- Servlets Interview Questions And Answers
- Struts Interview Questions And Answers
- Threads Interview Questions And Answers
- US Jobs city Wise
- All Indian Company Name List
- Web Designing Interview Questions Answers
- XML Interview Questions Answers
- XML Interview Questions Answers
- .net Interview Questions And Answers
- Accountant Interview Questions And Answers
- Ado.net Interview Questions And Answers
- Adp Interview Questions And Answers
- Agile Methodology Interview Questions And Answers
- Android Interview Questions And Answers
- Apache Interview Questions And Answers
- Application Packaging Interview Questions And Answers
- Asp Interview Questions And Answers
- Backbone.js Interview Questions And Answers
- C Sharp Interview Questions And Answers
- C++ Interview Questions And Answers
- Cake Interview Questions And Answers
- Cakephp Interview Questions And Answers
- Can Protocol Interview Questions And Answers
- Catia V5 Interview Questions And Answers
- Ccna Interview Questions And Answers
- Checkpoint Firewall Interview Questions And Answers
- Control M Interview Questions And Answers
- Cpp Interview Questions And Answers
- Css Interview Questions And Answers
- DATA GRID Interview Questions And Answers
- Data Warehouse Interview Questions And Answers
- Data Structures Interview Questions And Answers
- Database Interview Questions And Answers
- Db2 Interview Questions And Answers
- Desktop Engineer Interview Questions And Answers
- Desktop Support Interview Questions And Answers
- DOJO Interview Questions And Answers
- Electrical Engineering Interview Questions And Answers
- Embedded Systems Interview Questions And Answers
- Hadoop Interview Questions And Answers
- Hibernate Interview Questions And Answers
- J2ee Interview Questions And Answers
- Javascript Interview Questions And Answers
- Joomla Interview Questions And Answers
- Jsp Interview Questions And Answers
- Less Interview Questions And Answers
- Linq Interview Questions And Answers
- Linux Interview Questions And Answers
- Matlab Interview Questions And Answers
- Mcitp Interview Questions And Answers
- Netbackup Interview Questions And Answers
- Node.js Interview Questions And Answers
- Oracle Interview Questions And Answers
- Perl Interview Questions And Answers
- Plsql Interview Questions And Answers
- Postgresql Interview Questions And Answers
- Python Interview Questions And Answers
- Qa Testing Interview Questions And Answers
- Qtp Interview Questions And Answers
- Sap Interview Questions And Answers
- Sass Interview Questions And Answers
- Selenium Interview Questions And Answers
- SEO Interview Questions And Answers
- Sharepoint Interview Questions And Answers
- Silverlight Interview Questions And Answers
- Sql Dba Interview Questions And Answers
- String Interview Questions And Answers
- Struts2 Interview Questions And Answers
- Stware Testing Interview Questions And Answers
- Swing Interview Questions And Answers
- Technical Support Interview Questions And Answers
- Telecom Billing Interview Questions And Answers
- Tomcat Interview Questions And Answers
- Troubleshooting Interview Questions And Answers
- Uml Interview Questions And Answers
- Us Visa Interview Questions And Answers
- Vb Interview Questions And Answers
- Visa Interview Questions And Answers
- Wcf Interview Questions And Answers
- Web Testing Interview Questions And Answers
- Windows Interview Questions And Answers
- Wordpress Interview Questions And Answers
- Wpf Interview Questions And Answers
- XQuery Interview Questions And Answers
- Yii Interview Questions And Answers
- Zend Framework 2 Interview Questions And Answers
- Zend Framework Interview Questions And Answers